.jpg?width=100&height=75&name=NextPax%20logo%20(3).jpg)
When you decide to connect a property channel, your connection moves into Onboarding and a step-by-step setup wizard opens. The wizard walks you through everything the channel needs from you, one step at a time, keeping you on each step until the information it needs is complete.
The good news: most steps are identical for every channel. Account Setup, Rate Plans, Messaging, and turning the channel on all work the same way wherever you go. Each channel then adds its own specifics in a few places — chiefly how you establish your partnership, what operational settings it asks for, how you set a cancellation policy, and whether it offers promotions.
This guide is the baseline: it describes the default onboarding experience that applies to any channel. Where a channel does something of its own, you'll find the details in that channel's dedicated guide:
- Booking.com
- Airbnb
- Vrbo
- Trip.com
- Distribution API channels — every other channel.
Read this guide to understand the flow as a whole; open your channel's guide for the parts marked as channel-specific.
2. How onboarding works
Onboarding is a wizard: a sequence of steps shown in a stepper along the top (or side) of the page. Each step is one part of getting your channel ready.
The stepper. A progress bar shows each step as a numbered circle. The step you're on is highlighted; steps you've passed show a green check and can be clicked to go back and review them; steps still ahead are greyed out and locked until you reach them.
Next vs Save.
- Inside a step, Save (sometimes Save & continue) stores what you've entered so far. Many steps let you save partially and come back later — your progress is kept.
- Next moves you to the following step. A step's Next only enables once that step's required information is complete.
How steps unlock. The wizard is ordered. You go through the steps in sequence — you can't jump ahead to a later step until the current one is complete, but you can always go back to an earlier step to review or change it. The very first step, Account Setup, must be completed before you can move on to anything else (see §7). A few steps are optional and can be skipped: Promotions, Enable channel, and Enable properties — you can finish those later.
You can pause and return. Onboarding doesn't have to be done in one sitting. Save your progress, leave, and pick up where you left off. Some steps can count as complete while something is still finishing on the channel's side (for example, a contract awaiting signature), so you can carry on with later steps and come back — though whether a step works this way depends on the channel.
3. Partner Setup
Every channel needs you to establish a partnership with it before your properties can go live. This is the Partner Setup step. What it asks for depends entirely on the channel:
- Some channels need a contract to be arranged and signed.
- Some need you to activate an account you already hold with them.
- Some need a signup or an authorisation to connect an existing account.
Because this is the step that differs most between channels, the baseline covers only the shared frame below — see your channel's guide for the exact flow: Booking.com · Airbnb · Vrbo · Trip.com · Distribution API channels.
The standard question. Most channels open the step with the same question:
Before you continue, we need to understand whether you already have an active contract or partner setup with {Channel}. This determines the next steps of your onboarding.
- I already have an active contract or partner setup with {Channel}
- I need a new contract or partner setup with {Channel}
Your choice is saved immediately — there is no Confirm button. Choosing "I already have…" typically acknowledges your existing setup and lets you continue; choosing "I need a new one" opens the channel's own flow. Some channels skip the question entirely — their guide says so.
Connected. Once your partnership is established, the step shows a green banner — "Looks like your {Channel} partner setup is already arranged. Review it below, or continue to the next step." — and stays open so you can review or correct your setup at any time.
Waiting doesn't block you. In most cases the step counts as complete before the channel has finished its side (a contract awaiting signature, a confirmation still pending) — carry on with the next steps and come back. Channel guides call out where this works differently.
4. Channel Settings
The Channel Settings step collects the operational settings the channel needs from you. Settings are grouped into sections, and you'll usually see a way to move between groups (a chip bar or tabs); fill each group and save it.
Required vs optional. Some fields are required and some are optional. A group's Save button enables once its required fields are filled. Often, turning a particular option on makes a set of related fields required together — if you turn it off, you can leave those blank.
Partial save is allowed. You don't have to complete every group in one sitting. Save one group and come back to the others later; your progress is kept. The step is marked complete once all required fields across the groups are filled.
Which groups and fields appear here is channel-specific — each channel asks for what it needs; some channels don't show this step at all. See your channel's guide for the specifics.
5. Policy
The Policy step is where you set a default cancellation policy for the channel. This becomes the policy your properties use unless you set up others later.
How you set it depends on the channel:
- Some channels give you a guided builder. It asks the same few questions everywhere: is there a period when the guest can cancel free of charge? — if yes, how long before arrival can they cancel? — and what are they charged after the deadline? Your answers become one of the channel's standard policies.
- Other channels give you a predefined list to pick from.
Either way, this step sets a single default; you can usually add more policies later from the full Policies page after onboarding. Some channels don't show this step — their guide explains why that's fine.
6. Promotions
Some channels offer promotions as part of onboarding. When a channel supports them, a Promotions step appears where you can set up the promotion types that channel offers to help your properties stand out. Channels that don't support promotions simply won't show this step.
The promotion types on offer are channel-specific — see your channel's guide.
7. Other / Generic Steps
These steps work the same way for every channel. They're documented here in full; channel guides just point back to this section.
7.1 Account Setup (do this first)
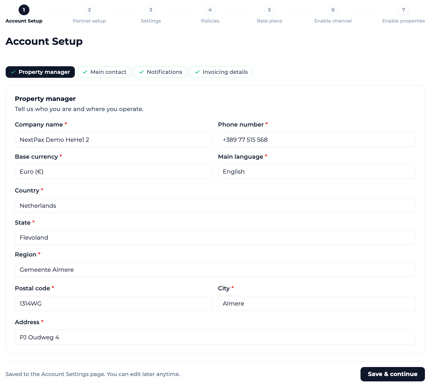
Account Setup is the first step of the wizard and a prerequisite for everything else. Until it's fully completed, the rest of the wizard stays locked.
It collects your company and operating details across four tabs:
- Company details — your company / legal entity information.
- Main contact — the primary person for this account.
- Notification preferences — how and where you want to be notified.
- Invoicing details — your billing and invoicing information.
Each tab has its own Save & continue. The wizard's Next button only enables once all four tabs show done. Fill them in order, save each one, and the rest of onboarding unlocks.
Account Setup is account-level: you do it once, and later channels reuse the same details rather than asking again.
7.2 Rate Plans
The Rate Plans step sets up the rate plan your properties will use on the channel — a rate plan ties your prices to booking rules and a cancellation policy. The step sets one default plan for the channel; more plans can be added later under Policies & Rate Plans → Rate Plans.
Creating a rate plan:
- Rate Plan Name — give it a recognisable reference name.
- Channels — which channels the plan applies to. Some channels require a plan assigned to them exclusively — your channel's guide will say so.
- Policies — the cancellation policy the plan carries.
- Restrictions — minimum length of stay and any advance-booking or date-specific restrictions; these are applied to the prices and availability sent to the channel.
Rate plans can be created for your whole account or per property — both are supported. Keep the plan active.
Not every channel includes this step, and on some channels the rate plan stays on the NextPax side (prices and availability flow to the channel directly) — your channel's guide notes both cases.
7.3 Messaging
The Messaging step configures how guest messages are handled. It has two sections:
- General (account-level) — the messaging model, API or Email, and your default redirection email for forwarded guest messages.
- {Channel} messaging — enable messaging for this channel and, optionally, override the redirection email for it.
Enabling messaging on the channel is optional — the step completes once the General section is filled. Per-channel auto-replies and welcome messages are managed later on the Messaging Settings page, not in the wizard.
Not every channel includes this step — your channel's guide will say so.
7.4 Enabling the channel & properties
The final steps turn everything on:
- Enable channel — done right here in the step: it shows a readiness checklist (a quick check that your required channel settings are complete), then an Activate channel button to switch the channel on. If the settings aren't ready yet, you can skip activation and do it later.
- Enable properties — opens the property overview in a new tab with this channel pre-selected; choose which properties to publish there, enable the ones you want live, then come back to the wizard.