.jpg?width=100&height=75&name=NextPax%20logo%20(3).jpg)
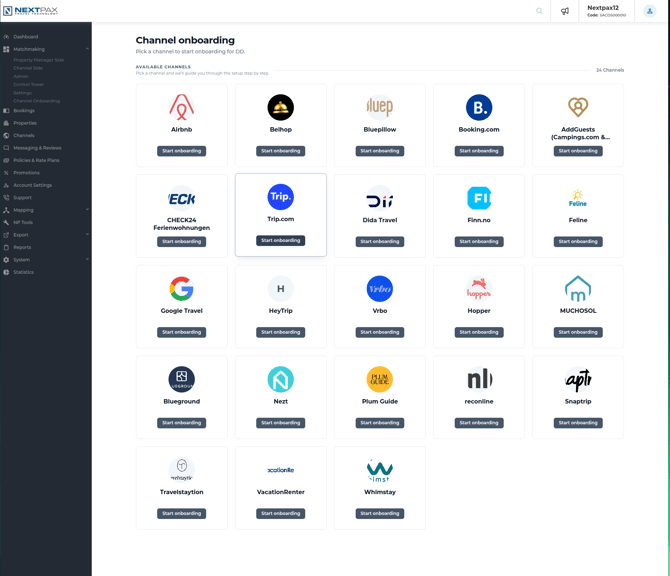
This guide covers what's specific to Trip.com when you onboard it through NextPax. It assumes you already understand how the onboarding wizard works in general — see the Generic partner guide first.
Good to know about the Trip.com connection:
- Full content export — NextPax pushes your property details, rooms, photos, fees and taxes to Trip.com, in addition to rates and availability.
- Rate plans are mandatory. Without a Trip.com rate plan your properties will not receive rates and availability — see §7.1.
- Trip.com uses its own cancellation policies, created with a short guided builder — see §5.
- Prices are sent as length-of-stay pricing — per check-in date, for stays of up to 30 nights, for the next 365 days.
- Promotions are not supported on Trip.com — see §6.
- Once you enable a property, it normally shows up on Trip.com within minutes.
The Trip.com-specific parts of the wizard are: Partner Setup (your Trip.com partnership and the sign-up form) and Policy. If your properties are already live on Trip.com — directly or through another channel manager — also read §8.
Before you start — finish Account Setup first. As with every channel, the wizard's first step, Account Setup, must be fully completed before anything else unlocks. See Generic §7.1. Everything below assumes Account Setup is already complete.
2. How onboarding works
Standard onboarding flow — see the Generic partner guide §2.
3. Partner Setup
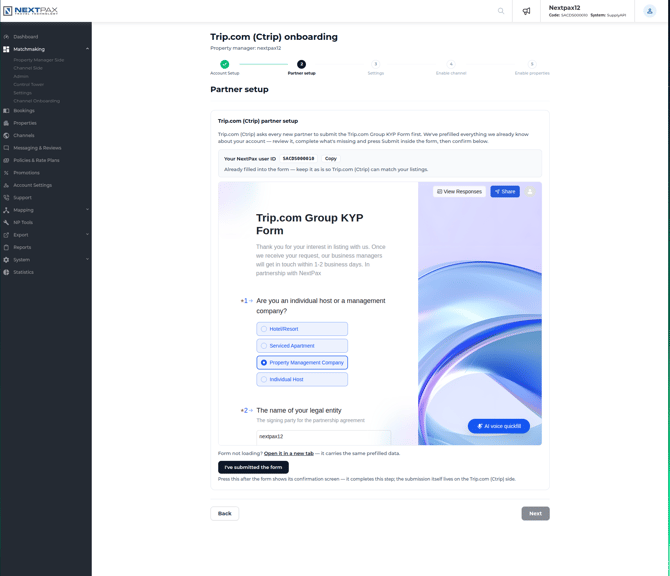
This step establishes your partnership with Trip.com (also known as Ctrip). There is nothing to choose here: every partner registers with Trip.com through Trip.com's own sign-up form (the Know Your Partner form), which opens directly in the step, embedded and pre-filled with your details — including your NextPax user ID.
- Keep the pre-filled NextPax user ID as-is. Trip.com uses it to match your submission to your account, so you won't have to fill in the form again for future listings.
- The form asks for: your host type (Hotel/Resort, Serviced Apartment, Property Management Company, or Individual Host), phone number and email address, how many listings you manage, and the countries your properties are located in.
- If the embedded form does not load, click Open it in a new tab — it carries the same pre-filled data.
- After submitting, come back to the wizard and click I've submitted the form to continue.
If your Trip.com partner setup is already arranged through NextPax, the step says so and shows your setup for review instead — just continue to the next step.
3.1 ⭐ What happens after you submit the form — read this
- Trip.com's business managers get in touch within 1–2 business days.
- You don't have to wait for the contract to publish your properties — you can continue onboarding and push listings right away.
- Trip.com allows 5 business days to complete the contract. If it isn't finished within that window, Trip.com temporarily closes your listings until the contract is in place.
4. Channel Settings
No Trip.com-specific settings — there are no credentials or codes to enter; your connection runs under NextPax's partnership with Trip.com automatically. Review the general settings and continue — see the Generic partner guide §4.
5. Policy
Trip.com uses its own cancellation policies. In this step you set the channel default by answering a few questions:
- Is there a period of time when the guest can cancel free of charge? — Yes creates a refundable policy, No a non-refundable one.
- How long before arrival can the guest cancel free of charge? — pick the cut-off from the list.
- How much is the guest charged for cancellation after the specified time? — a percentage of the reservation amount, or a first-night penalty.
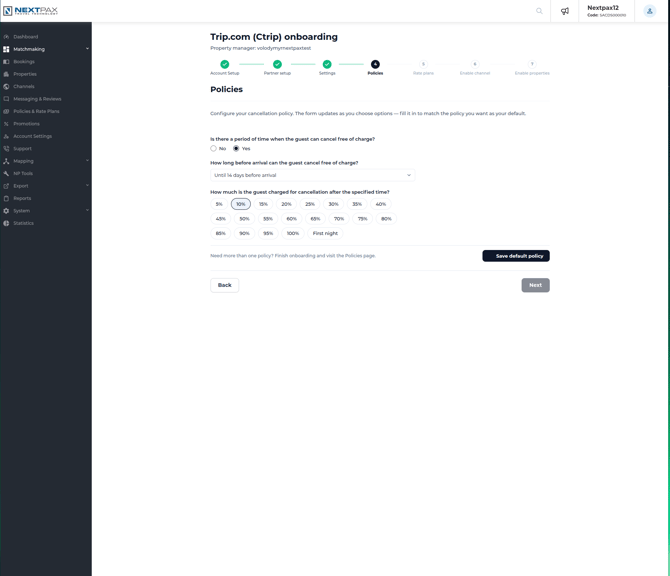
Only one default policy can be set here. To add more policies after onboarding, go to Policies & Rate Plans → Cancellation and Prepayment Policies, scroll to the Trip.com section, click Add New Policy, and answer the same questions. Make sure each policy you want to use is active.
6. Promotions
Promotions are not supported on Trip.com. The wizard has no Promotions step for this channel, and there is nothing to configure on the Promotions page later either.
7. Other / Generic Steps
Account Setup, Enable channel, and Enable properties work the standard way — see the Generic partner guide §7. The Messaging step does not appear for Trip.com. Two Trip.com particulars:
7.1 Rate Plans (mandatory)
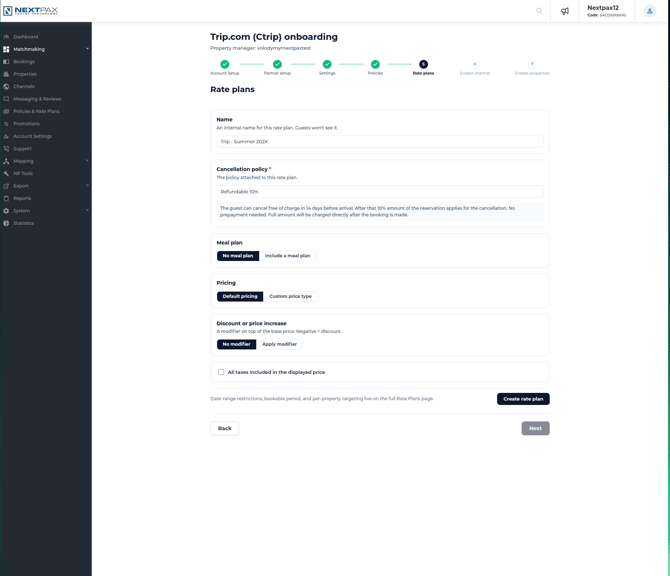
The step itself works the standard way — see Generic §7.2 for how to create a rate plan. Trip.com particulars:
- A rate plan is mandatory. Without an active Trip.com rate plan, rates and availability are not sent and the property cannot become bookable.
- Channels: select Specific Channels → Trip.com (Ctrip). Do not use All Channels, and do not combine Trip.com with other channels in one rate plan — a shared rate plan will not be picked up by Trip.com.
- Policies: select one of your Trip.com cancellation policies (required — see §5).
7.2 After enabling properties
Once you enable properties with content and click Finish, NextPax creates them on Trip.com automatically — normally they appear within minutes.
Heads-up: Trip.com may show a property as "live" in their extranet before the setup has fully completed (for example, while rates are still being delivered). If a property looks live but isn't bookable yet, give it a moment — and if it stays that way, contact NextPax support rather than assuming it's done.
8. (NEEDS TO BE CONFIRMED) Switching from another channel manager (takeover)
If your properties are already live on Trip.com — managed directly in the Trip.com extranet, or through another channel manager — switching to NextPax is a takeover, not a new listing. Your property page, reviews, amenities and previously configured photos are kept.
How it works:
- OPLATE.md §6: new file, copy the skeleton, fill
differences or stub → Genericnboard the Trip.com channel in NextPax as usual (everything above still applies — including the rate plan). - NextPax notifies Trip.com which of your properties are being taken over. You don't need to contact Trip.com yourself.
- Trip.com and NextPax then migrate the connection. Typical timeline: content within 1 business day, linking to your existing Trip.com listing within 2 business days, rates and availability within 1 business day.
- Double-check your content, rates and availability on Trip.com once the migration completes.
- Payment method: after a takeover, payouts default to virtual credit card (VCC) — regardless of what you used before. If you need a different method (e.g. bank transfer), change it via Trip.com's payment settings.
- Only then disconnect the previous channel manager. Keep the old connection until everything is confirmed working through NextPax.
⭐ Reservations are not carried over. Bookings made before the switch stay with your old connection and do not flow into NextPax — this is a limitation on Trip.com's side. Keep managing those reservations (including cancellations and changes) directly in the Trip.com extranet. Only reservations made after the migration completes arrive through NextPax.
There is no limit on how many properties can be migrated in one batch — large portfolios just take longer.